Tuesday 11 October 2011

Color Coded Calendar 2007 with fully covered color area


Before start this post I am thanking to the blog planetwilson because I found the color coded calendar article from there this is a modified version from there.
Step 1.  Create a calendar list in your sharepoint server
Step 2.  Create a column name Category  type--> choice    
  
 3.  Create a calculated column
Add caption
     Step 4:  Change the View settings


Step 5:  Add an Content Editor Webpart under the Calendar Control

Step 6:  Paste the following code

<script> 
 var SEPARATOR = "|||"; 
 var nodes, category; 
 nodes = document.getElementsByTagName("a"); 
 function getObjInnerText (obj) 
 {
   return (obj.innerText) ? obj.innerText : (obj.textContent) ? obj.textContent : ""; 
 }  
 for(var i = 0; i < nodes.length; i++) 
 { 
   if(getObjInnerText(nodes[i]).indexOf(SEPARATOR) != -1) 
   { 
     UpdateCalendarEntryText(nodes[i]); 
     var foundNode = nodes[i]; 
     var trap = 0; 
     while(foundNode.nodeName.toLowerCase() != "td") 
     { 
       foundNode = foundNode.parentNode; 
       trap++; 
       if(trap > 10) 
       { 
         break; // don't want to end up in a loop 
       } 
     } 
     var colourinfo = GetCalendarColourInfo(category); 
     if(colourinfo.bg != "") 
     { 
          var temp= foundNode.parentNode; 
          temp=temp.parentNode;
          temp=temp.parentNode;    

          temp.parentNode.style.background = colourinfo.bg; 
          foundNode.style.background = colourinfo.bg; 
     } 
     // try and update the text colour if we can TD/A/NOBR/B/#text 
     if(colourinfo.fg != "") 
     { 
       try 
       { 
         // there should only be one anchor tag 
         childNodes = foundNode.all; 
         for(var j = 0; j < childNodes.length; j++) 
         { 
           if(childNodes[j].nodeName.toLowerCase() == "a") 
           { 
             // found anchor tag 
             childNodes[j].style.color = colourinfo.fg; 
             // set the NOBR tag as well to set the time if it is shown, but set it on the B tag for month view 
             if(childNodes[j].children[0].nodeName.toLowerCase() == "nobr") 
             {  // month view has an extra b tag surrounding the text 
               childNodes[j].children[0].style.color = colourinfo.fg; 
               if(childNodes[j].children[0].children[0].nodeName.toLowerCase() == "b") 
               { 
                 childNodes[j].children[0].children[0].style.color = colourinfo.fg; 
               } 
             } 
             break; 
           } 
         } 
       } 
       catch(e) {} 
     } 
   } 
 } 
 function ColourInfo(bg, fg) 
 { 
   this.bg = bg; 
   this.fg = fg; 
 } 
 function UpdateCalendarEntryText(anchorNode) 
 { 
   var children = anchorNode.childNodes; 
   for(var i = 0; i < children.length; i++) 
   { 
     if(children[i].nodeType == 3 && children[i].nodeValue.indexOf(SEPARATOR) != -1) 
     { 
       var parts = children[i].nodeValue.split(SEPARATOR); 
       category = parts[0]; 
       children[i].nodeValue = parts[1];     
     } 
     else 
       UpdateCalendarEntryText(children[i]); 
   } 
 } 
 function GetCalendarColourInfo(desc) 
 { 
   var colour = new ColourInfo("", ""); 
   var trimmed = desc.replace(/^\s+|\s+$/g, '') ; 
   switch(trimmed.toLowerCase()) 
   { 
      case "appointment": 
           colour.bg = "#ffd266"; 
           colour.fg = ""; 
           break; 
           case "birthday": 
           colour.bg = "#ae99dc"; 
           colour.fg = ""; 
           break; 
           case "business": 
           colour.bg = "#8aabe0"; 
           colour.fg = ""; 
           break; 
           case "important": 
           colour.bg = "#e77379"; 
           colour.fg = ""; 
           break; 
           case "vacation": 
           colour.bg = "#fffa91"; 
           colour.fg = ""; 
           break; 
     default: 
     { 
       colour.bg = ""; 
       colour.fg = ""; 
     } 
   } 
   return colour; 
 } 
 </script> 

Step 5:  Exit the edit mode   Happy Coding

Configure outgoing e-mail settings (Office SharePoint Server)


Use this procedure to configure the default outgoing e-mail settings for all Web applications. You can override the default outgoing e-mail settings for specific Web applications by using the procedure that is described in Configure outgoing e-mail settings for a specific Web application (Office SharePoint Server).

Install and configure the SMTP service

Before you can enable outgoing e-mail, you must install the Internet Information Services (IIS) Simple Mail Transfer Protocol (SMTP) service. After determining which SMTP server to use, the SMTP server must be configured to allow anonymous access and to allow e-mail messages to be relayed. Additionally, the SMTP server must have Internet access if you want the ability to send messages to external e-mail addresses, or it must be able to relay authenticated e-mail to a server that has Internet access. The SMTP server that you use can be a server in the farm, or another server.

Install the SMTP service

The SMTP service is a component of IIS.

Install the SMTP service

  1. In Control Panel, click Add or Remove Programs.
  2. In Add or Remove Programs, click Add/Remove Windows Components.
  3. In the Windows Components Wizard, in the Components box, click Application Server, and then click the Details button.
  4. In the Application Server dialog box, in the Subcomponents of Application Server box, click Internet Information Services (IIS), and then click the Details button.
  5. In the Internet Information Services (IIS) dialog box, select the SMTP Service check box.
  6. Click OK to return to the Application Server dialog box.
  7. Click OK to return to the main page of the Windows Components Wizard.
  8. Click Next.
  9. When Windows has finished installing the SMTP service, on the Completing the Windows Components Wizard page, click Finish.

Configure the SMTP service

After installing the SMTP service, configure the service to accept relayed e-mail from servers in your farm.
You can decide to accept relayed e-mail from all servers except those you specifically exclude. Alternatively, you can block e-mail from all servers except those you specifically include. You can include servers individually, or in groups by subnet or domain.
By enabling both anonymous access and e-mail relaying, you increase the possibility that the SMTP server will be used to relay unsolicited commercial e-mail (spam). It is important to limit this possibility by carefully configuring your mail servers to help protect against spam. One way that you can do this is by limiting relaying to a specific list of servers or domain, and preventing relaying from all other servers.
Important Important:
Membership in the Administrators group on the local computer is required to complete this procedure.

Configure the SMTP service

  1. Click Start, point to All Programs, point to Administrative Tools, and then click Internet Information Services (IIS) Manager.
  2. In IIS Manager, expand the server name that contains the SMTP server that you want to configure.
  3. Right-click the SMTP virtual server that you want to configure, and then click Properties.
  4. On the Access tab, under Access control, click Authentication.
  5. In the Authentication dialog box, under Select acceptable authentication methods for this resource, verify that Anonymous access is selected.
  6. Click OK.
  7. On the Access tab, under Relay restrictions, click Relay.
  8. To enable relaying from any server, under Select which computer may relay through this virtual server, select All except the list below.
  9. To accept relaying from one or more specific servers, follow these steps:
    1. Under Select which computer may relay through this virtual server, select Only the list below.
    2. Click Add, and then add servers one at a time by IP address, or in groups by using a subnet or domain.
    3. Click OK to close the Computer dialog box.
  10. Click OK to close the Relay Restrictions dialog box.
  11. Click OK to close the Properties dialog box.

Configure outgoing e-mail settings

Important Important:
Membership in the Farm Administrators group of the Central Administration site is required to complete this procedure.

Configure outgoing e-mail settings

  1. On the top navigation bar of the SharePoint Central Administration Web site, click Operations.
  2. On the Operations page, in the Topology and Services section, click Outgoing e-mail settings.
  3. On the Outgoing E-Mail Settings page, in the Mail Settings section, type the SMTP server name for outgoing e-mail (for example, mail.example.com) in the Outbound SMTP serverbox.
  4. In the From address box, type the e-mail friendly address as you want it to appear to e-mail recipients.
  5. In the Reply-to address box, type the e-mail address to which you want e-mail recipients to reply.
  6. In the Character set menu, select the character set that is appropriate for your language.
  7. Click OK.
    For information about how to perform this procedure using the Stsadm command-line tool, see Email: Stsadm operation (Office SharePoint Server).

Thursday 18 August 2011

Difference between Classic Authentication and Claim based authentication

What are the differences between Classic Mode Authentication and Claims based Authentication?

Classic Mode Authentication: It refers to the integrated windows authentication. You cannot configure the Forms based authentication if your web application is using Classic Mode Authentication. You can convert a web application from Classic Mode Authentication to Claims Based Authentication. However, that can only be done using PowerShell commands and its an irreversible process. I have detailed steps to convert the web application from Classic Mode authentication to Claims Based Authentication.

Claims Based Authentication: SharePoint 2010 is built on Windows Identity Foundation. It enables authentication from windows as well as non-windows based systems. This also provides the capability to have multiple authentication in a single URL.

Thursday 4 August 2011

What is Server Farm and Front End Web Server

Server Farm:
SharePoint Server farm environments can encompass a wide range of topologies, and can include many servers or as few as two servers.
  • A small server farm typically consists of a database server running Microsoft SQL Server , and one or more servers running Internet Information Services (IIS) and Office SharePoint Server 2007. In this configuration, the front-end servers are configured as Web servers and application servers. The Web server role provides Web content to clients. The application server role provides Office SharePoint Server 2007 services such as servicing search queries, and crawling and indexing content.
  • A medium server farm typically consists of a database server, an application server running Office SharePoint Server 2007, and one or two front-end Web servers running Office SharePoint Server 2007 and IIS. In this configuration, the application server provides indexing services and Excel Calculation Services, and the front-end Web servers service search queries and provide Web content.
  • A large server farm typically consists of two or more clustered database servers, several load-balanced front-end Web servers running Office SharePoint Server 2007, and two or more application servers running Office SharePoint Server 2007. In this configuration, each of the application servers provides specific Office SharePoint Server 2007 services such as indexing or Excel Calculation Services, and the front-end servers provide Web content.
  • You can deploy Office SharePoint Server 2007 in a server farm environment if you are hosting a large number of sites, if you want the best possible performance, or if you want the scalability of a multi-tier topology. A server farm consists of one or more servers dedicated to running the Office SharePoint Server 2007 application
Front End Web Server

            In a server farm environment, the front-end Web servers contain only the files and settings required to route requests from clients to the appropriate sites in the database. Unlike in SharePoint Team Services v1.0 from Microsoft, they do not contain site data.
            All site content and all configuration data is shared for all front-end Web servers in a server farm. To get the best performance and the best protection against hardware failure, you should configure Windows SharePoint Services identically on all the front-end Web servers in your server farm.

Wednesday 3 August 2011

Site collection & Subsite defintion

Site Collection:
                 A SharePoint site collection is a hierarchical set of sites that can be managed together. Sites within a site collection have common features, such as shared permissions, galleries for templates, content types, and Web Parts, and they often share a common navigation. A site collection contains a single top-level site, and any number of subsites organized in a hierarchy. A subsite is a single SharePoint site within a site collection.


SubSites:
A subsite can inherit permissions and navigation structure from its parent site, or these can be specified and managed independently. Creation of subsites can be delegated to users of a site collection, but creation of site collections must be performed by a service administrator.

Saturday 30 July 2011

Object Model Defintion in Sharepoint

What is Object Model:
        Collection of classes and methods in general.   At the time of developing webparts or workflow we need some details from the SharePoint site it may be a list item, list, site url , subsite exatra....    To provide these information SharePoint have predefined collection of classes, object and function this is exactly called Object Model in SharePoint.

          For example SPContext return the information about the current site.


Friday 29 July 2011

Site Definition -- Defintion


Site Definition
  • Site Definitions are the foundations on which all sites and user templates are built. 
  • Site Definition is collection ox XML and .aspx file.
  • Site Definitions are predefined components needs to be included when a site was created in SharePoint server.
  • Site Definition contains information of Web Part , Lists, Features and navigation bars to be included in the site.
  • Customizing Portal Sites and other SharePoint sites using Site Definition is most appropriate for third party developer and SharePoint Administrator.
  • Site Definitions requires access to a file system of the Web Server.
  • Server administrator must be also involved in deployment of Site Definitions. 
  • Custom Site Definitions are Version and Upgrade independent. 
  • Subsequent upgrades to SharePoint products  and technologies may overwrite  existing Site Definitions. Using Custom Site definition exclude site from potential upgrade issues. 
  • To avoid Unghosting  , Custom Site Definition is to be create.
  • There are two options to create it
    1. Create New Site Definition File : Either Start from Scratch and create files one by one  or Copy an existing Site Definition and modify it.
    2. Copy a Site Definition and change it in Visual Studio:   We can make copy an existing site definition and modify it in visual studio to create new site definition.
  • The configuration of this site definitions are defined in XML file which is available in

    C:\Program Files\Common Files\Microsoft Shared\web server extensions\12\TEMPLATE\1033\XML folder.

  • In the file system these definitions are available in C:\Program Files\Common Files\Microsoft Shared\web server extensions\12\TEMPLATE\Site Templates.
  • Each of these site definitions consists a XML folder and a Home page (default.aspx).

Thursday 7 July 2011

How to Handle PostBack event in Sharepont 2010 C# webpart

The dynamic control generation is always done by the help of 'createchildcontrols' function.  Here we must handle the postback event to avoid the creation of control at each and every time. For that in asp we use

if(!ispostback)

like that here

we use

if(!page.ispostback)

Friday 1 July 2011

How to Read,Update LookUp fields in SharePoint List

Lookup fields in SharePoint provides a great way to pickup dynamically changing values from a dropdown list.But programmatic access of this type of fields is not straightforward. The actual list item value is stored as ID:#Value. Where ID is reference to the id of referring list and value is the value selected. SharePoint SDK provides APIs to read and update lookup fiedls. SPFieldLookupValue object can be used to read and update/insert lookup fields.
For example:
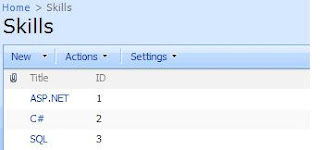
Lets create a sample master list "Skills ", add following values:
ASP.Net
C#
SQL

Following is screen shot of the master list "Skills":


Now create another custom list "My Skills", with a lookup field which refers to Title column of "Skills" list, which is created earlier.

Following code snippet, reads and updates the "TechSkills" field of "My Skills" list.


using (SPSite site = new SPSite("http://servername"))
{
using(SPWeb web = site.OpenWeb())
{
SPList list = web.Lists["My Skills"]; //List which has lookupfield TechSkills
SPListItemCollection itemCollection;
itemCollection = list.Items;
foreach (SPListItem item in itemCollection)
{
SPFieldLookupValue lookupField = new SPFieldLookupValue(item["TechSkills"].ToString());
string lookUpValue = lookupField.LookupValue;
Console.WriteLine("List item actual value:" + item["TechSkills"].ToString());
Console.WriteLine("List item lookfield value:" + lookUpValue);
}
SPListItem listItem = itemCollection[0];
listItem["Skill Name"] = new SPFieldLookupValue(1, "ASP.Net"); //ID field of ASP.Net is 1
listItem.Update();
}
}

How to rectify the IIS error occured at the time of debug a web part

Steps
  1. start->run type 'inetmgr' to open IIS manager
  2. Click the domain name and select your application pool the click advanced settings
  3. In the property window     
  • Set Ping Enabled to False.
  • Set Ping Maximum Response Time to a value that is larger than 90 seconds.
              

How to enable debugging in visual studio 2010 for a web part

Steps:
  1. Set break point as you needed.
  2. Debug -> Attach Process 
  3. A window appears select any wpw3.exe then click ok then click confirm
  4. Start Debug

Friday 24 June 2011

How to Display Active Directory User details inculding Expiry Date

using System;
using System.Collections.Generic;
using System.Linq;
using System.Text;
using System.DirectoryServices;
using Microsoft.VisualBasic;

namespace AD
{
    class Program
    {
          
        static public void Main(string[] args)
        {
            string username = "testuser1";
            DirectoryEntry user = new DirectoryEntry("LDAP://CN=" + username + "," + " OU= Web Users,DC=CGSTAGE,DC=com", null, null, AuthenticationTypes.Secure);
           
            // GetInt64 is used to conver system._comObject to 64bit integer
            DateTime expires = DateTime.FromFileTime(GetInt64(user, "accountExpires"));
          
            Console.WriteLine(expires.ToString());

            Console.WriteLine("Display Name "+user.Properties["displayName"].Value.ToString());
            Console.WriteLine("First Name "+user.Properties["givenName"].Value.ToString());
            Console.WriteLine("Last Name "+user.Properties["sn"].Value.ToString());
            Console.WriteLine("Mail ID "+user.Properties["mail"].Value.ToString());


            Console.ReadKey();

        }

           
        static public Int64 GetInt64(DirectoryEntry entry, string attr)
        {           
            DirectorySearcher ds = new DirectorySearcher(
                entry,
                String.Format("({0}=*)", attr),
                new string[] { attr },
                SearchScope.Base
                );

            SearchResult sr = ds.FindOne();

            if (sr != null)
            {
                if (sr.Properties.Contains(attr))
                {
                    return (Int64)sr.Properties[attr][0];
                }
            }
            return -1;
        }

    }
}

Thursday 23 June 2011

How to read the Roles and Groups names from a web application- program

using System;
using System.Collections.Generic;
using System.Linq;
using System.Text;
using Microsoft.SharePoint;


namespace consolechk
{
    class Program
    {
        static void Main(string[] args)
        {
            SPSite site1 = new SPSite("http://stage2008:5678/");
            SPWeb web = site1.OpenWeb();
            SPGroupCollection groupcoll = web.Groups;
            foreach (SPGroup group in groupcoll)
             {
                  System.Console.WriteLine(group.Name.ToString());
             }

              Console.WriteLine();
              Console.WriteLine();
              SPRoleCollection rolecoll = web.Roles;
           foreach (SPRole role in rolecoll)
            {
                Console.WriteLine(role.Name.ToString());
            }

            System.Console.ReadLine();
        }
    }
}